

Your checkout is the last screen a shopper sees before they pay. It should look like your brand, answer those last-second questions, and make saying yes feel easy. The good news? In 2026 you can customize the Shopify checkout more than ever, and most of it takes zero code.
The catch is that the rules changed a lot over the last couple of years. checkout.liquid is gone, Shopify Scripts stopped running, and checkout customization now runs on Shopify's app and extension framework (you'll often see it called Checkout Extensibility). This guide covers what you can customize on every plan, what still needs Shopify Plus, and a simple step-by-step way to set it all up.
What changed with Shopify checkout customization
Here's a quick recap so you know where things stand:
- checkout.liquid is retired. It's no longer supported on the Information, Shipping, and Payment steps, and Shopify sunset
checkout.liquidand additional scripts on the Thank you and Order status pages on August 28, 2025 (Shopify.dev). - The Thank you and Order status pages got new versions. August 26, 2026 was the deadline for stores on non-Plus plans to upgrade to them. When you upgrade, old customizations on those pages are replaced, so they need to be rebuilt with blocks and pixels (Shopify Help Center).
- Shopify Scripts are done. Scripts stopped running on June 30, 2026. Discount, shipping, and payment logic now lives in Shopify Functions (Shopify developer changelog).
- Branding is unified. Since May 2026, your checkout branding carries across checkout, customer accounts, and sign-in pages, all from the checkout and accounts editor (Shopify changelog). Stores on Shopify's Advanced and Plus plans can also customize settings, branding, and blocks by market.
- No new background images. As of February 5, 2026, you can't add a new background image to the checkout header or main content area (Shopify Help Center).
If your store used checkout.liquid and you're still mapping old customizations to new ones, our guide to replacing checkout.liquid customizations goes deeper on that.
What you can customize on every plan vs. Shopify Plus only
This is where most guides get fuzzy, so here's how Shopify breaks it down (checkout app availability, checkout and accounts pages).
Basic plan and higher
- The checkout and accounts editor
- Standard branding: logo, colors and a color palette, fonts, buttons, form fields, and more
- Apps with blocks for the Thank you and Order status pages
- Apps with blocks for customer accounts pages
- Public App Store apps that use Shopify Functions (discounts, payment and delivery rules, validation)
- Apps built with web pixel extensions (tracking) and post-purchase extensions
Shopify Plus only
- Apps that customize the Information, Shipping, and Payment steps (in-checkout blocks like banners, custom fields, trust badges, and upsells)
- Custom apps built with Shopify Functions
- Advanced branding, either with the branding editor in Shopify's free Checkout Blocks app or the Checkout and Accounts Configuration API (the 2026 replacement for the Checkout Branding API)
In short: if you're not on Plus, your playground is branding, the Thank you and Order status pages, and Functions-powered apps. On Plus, you can also put blocks right inside the checkout steps.

Step 1: Brand your checkout in the checkout and accounts editor
Start with the look. It's included on every plan, and it makes the biggest first impression.
- In your Shopify admin, go to Settings → Checkout.
- In the Configurations section, click Edit on the configuration you want to customize.
- Open the Settings sidebar (the gear icon).
- Add your logo under Logo, then set its Width and Alignment.
- Add your brand colors to the Color palette so you can reuse them everywhere.
- Set colors for Header, Main, Order summary, and Accent and buttons.
- Pick fonts under Typography (Headings and Body).
- Click Save.
Tip: duplicate your live configuration first so you have a backup draft to experiment with. And keep contrast high. Shoppers are typing addresses and card numbers here, so readability beats flair every time.
While you're in the Settings sidebar, check your Checkout layout. One-page checkout is the default, and you can switch to Three-page checkout if you prefer.
On Plus? You can go further (section styles, buttons, form controls, and custom fonts) with the branding editor in Checkout Blocks or the Checkout and Accounts Configuration API.
Step 2: Add app blocks (checkout UI extensions)
Branding handles the look. Apps handle almost everything else: banners, custom fields, trust badges, reviews, surveys, and upsells. They're built with checkout UI extensions and show up as blocks you place in the editor.
- Install a checkout app from the Shopify App Store. To find compatible apps, search and then filter with Refine → Customizes checkout.
- Open the checkout and accounts editor and choose a page from the page selector at the top.
- In the Sections sidebar, click Add block in the section where you want it. You can also add blocks from the Apps sidebar.
- Click the block to configure its settings, move it into place, and click Save.
Here's how that looks with Checkout Plus: set the block up in the app first. Go to Apps → Checkout Plus → Customize your Checkout, open Custom Banner Message, and click Manage to write your message in a settings profile. Then, in the checkout editor, click Add block, choose Custom Banner under Checkout Plus, and pick the matching profile in Custom Banner Settings Profile. Other Checkout Plus blocks, like Custom Input for extra fields, surveys, and upsells, follow the same set up, then place flow. Our countdown timer guide walks through a full banner setup.
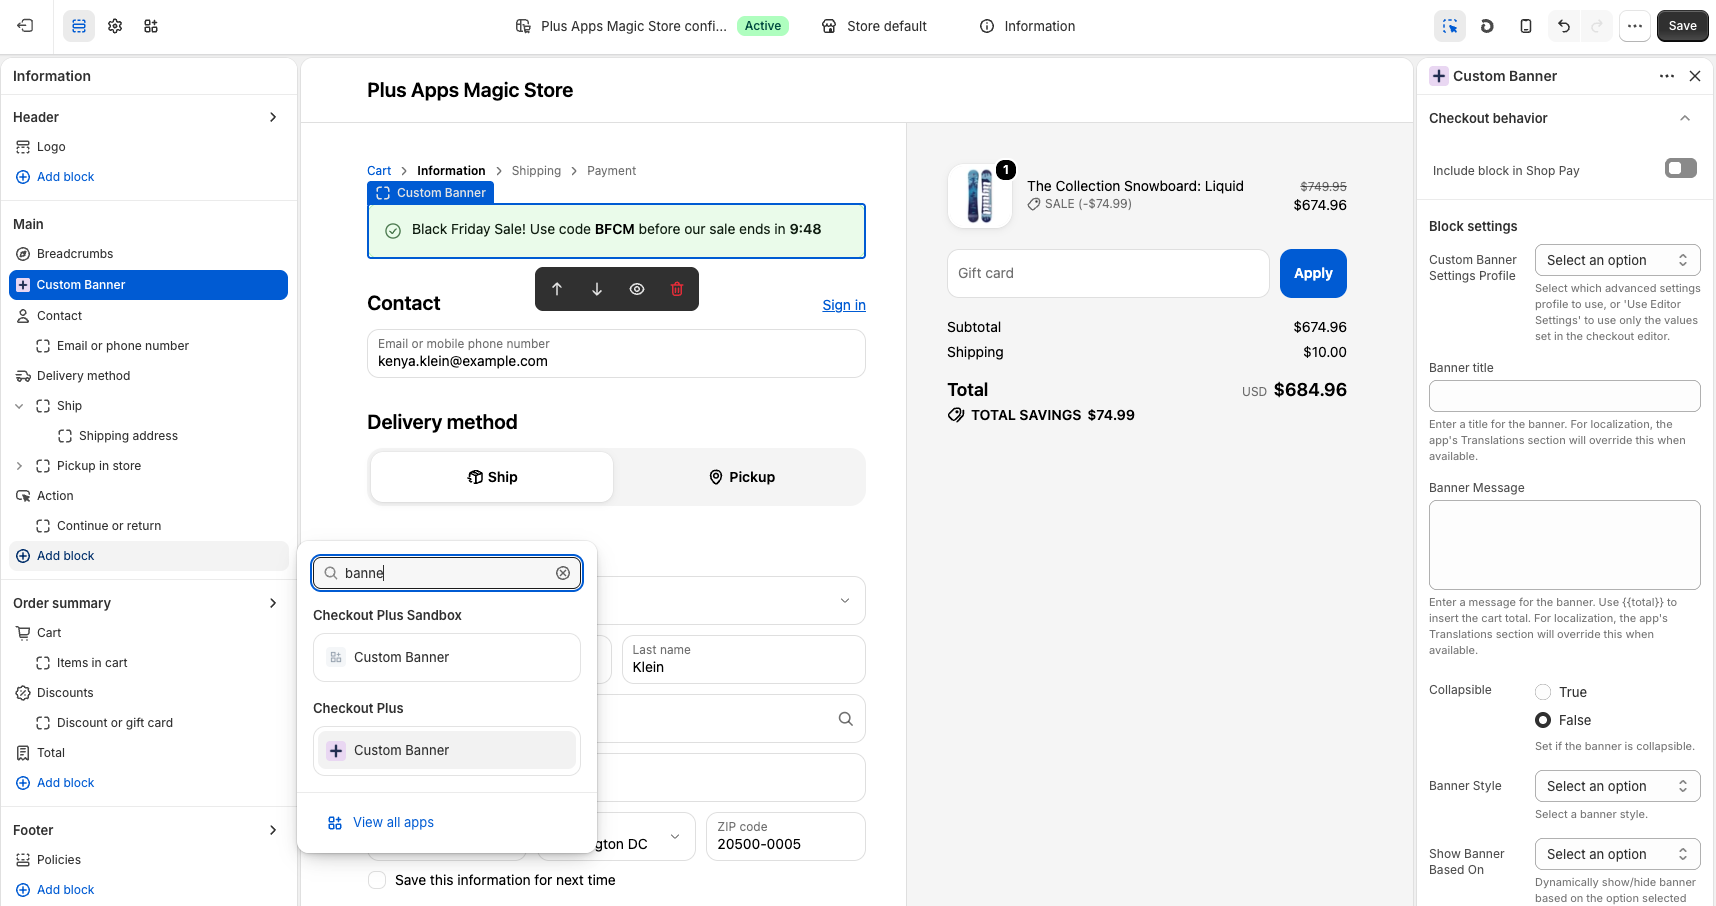
A few things worth knowing:
- Blocks on the Information, Shipping, and Payment steps need Shopify Plus. On other plans, put your blocks on the Thank you and Order status pages.
- Shopify allows a maximum of 3 apps per highlighted area, so pick the blocks that matter most.
- Want a block to show in Shop Pay too? Check the block's settings. In Checkout Plus, that's Include block in Shop Pay.
New to the tech behind this? Our explainer on what Shopify checkout UI extensions are covers the basics.
Step 3: Use Shopify Functions for discounts, payment, and shipping logic
Some checkout customizations aren't visual at all. They're rules. That's what Shopify Functions are for: custom backend logic that runs during checkout. Common uses include:
- Discounts: new discount types that apply in the cart and at checkout
- Payment customizations: rename, reorder, or hide payment options (for example, hiding cash on delivery for certain carts)
- Delivery customizations: rename, reorder, or hide shipping options
- Cart and checkout validation: stop checkout when a rule isn't met, like a maximum quantity per order
Here's the nice part: stores on any plan can use public App Store apps that include Functions. Only custom apps with Functions need Shopify Plus (Shopify.dev). So you usually don't need a developer for this.
For example, Checkout Plus handles payment and shipping method rules plus order validations and limits on its Basic plan (works on all Shopify plans), like blocking orders to certain countries. For discount logic like BOGO, volume, bundles, and gift with purchase, that's what Discount Plus is for.
Step 4: Customize the Thank you and Order status pages
If you're not on Plus, this is your biggest opportunity. Even on Plus, it's a great spot for asks that would crowd the checkout.
The Thank you page shows one time, right after purchase. The Order status page is where customers come back to check on their order, so it gets repeat visits.
Shopify's own ideas for these pages include surveys, product reviews, upsell offers, social sharing, and download links for digital goods (Shopify.dev). Add blocks the same way as Step 2, just pick Thank you or Order status in the page selector.
Don't forget tracking. Old additional scripts don't run on the new pages. Move conversion tracking to pixels in the Customer events section of your admin, using app pixels from your ad and analytics apps or a custom pixel (Shopify Help Center). Web pixels run in a sandbox and respect customer consent choices (Shopify.dev).
Step 5: Test and QA before you go live
The editor uses a simulated checkout, so you can't place orders in it. Do a proper test pass before you publish:
- Preview every page from the page selector (Checkout, Thank you, Order status).
- Switch to the mobile preview and make sure nothing feels cramped.
- Preview Shop Pay with the Shop Pay icon in the editor.
- Place real test orders through your storefront.
- Test your rules with carts that should and shouldn't trigger each discount, payment rule, shipping rule, and validation.
- If you sell internationally, check each market and language.
- Confirm your pixels record a test purchase in your analytics and ad platforms.
- Make bigger changes in a draft configuration, then publish it when it's ready.
Prepping for a big sale? Our Black Friday merchant checklist has a full QA pass/fail list.
How to customize the Shopify checkout with Checkout Plus (no code)
If you'd rather not build extensions yourself, an app can do the heavy lifting. Checkout Plus is our app for this (so yes, we're a little biased). It's built on the same checkout UI extensions and Functions covered above, and every block follows the set up, then place flow from Step 2. Here's what a few popular customizations look like.
Custom banner with a countdown timer
Use a Custom Banner for shipping cutoffs, sale announcements, or policy reminders. Want urgency? Insert the Countdown timer dynamic value into the banner message so shoppers see a live countdown. Just tie it to a real deadline.
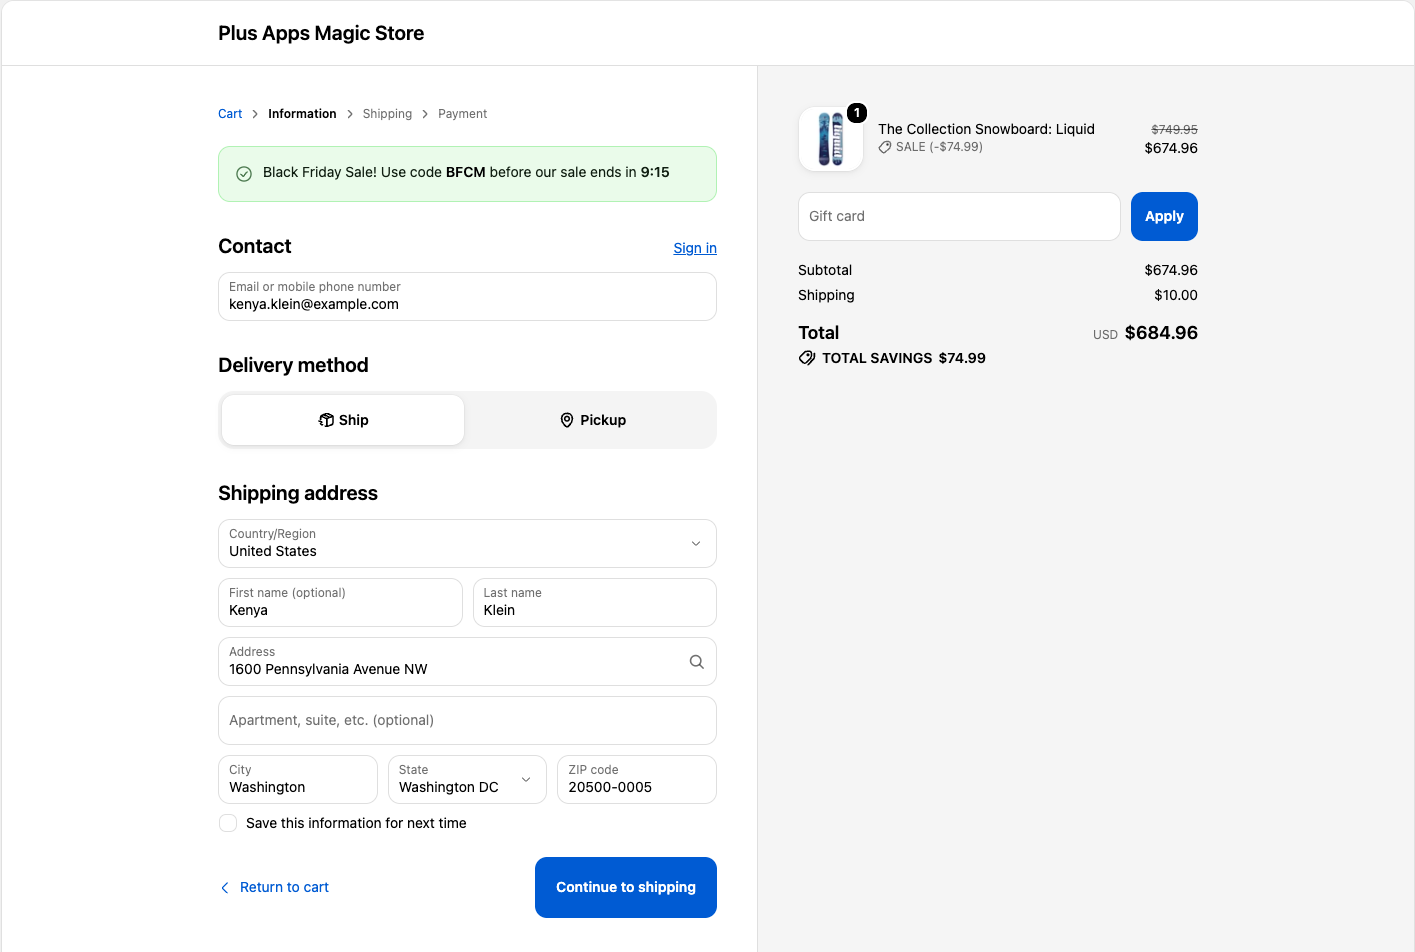
Full walkthrough: How to add a countdown timer with Checkout Plus.
Custom input fields
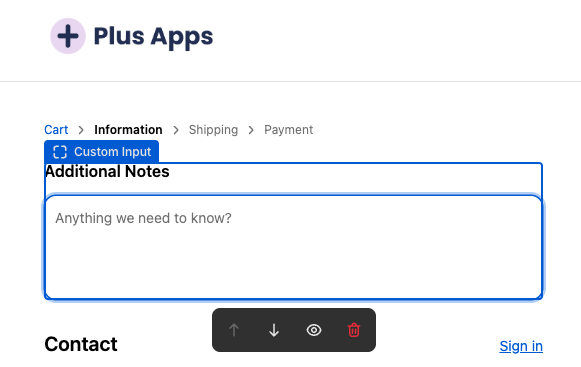
Collect gift messages, delivery notes, or special instructions with Custom Input. It now supports a text area type, so shoppers have room for longer notes instead of cramming them into one line.
Surveys and forms
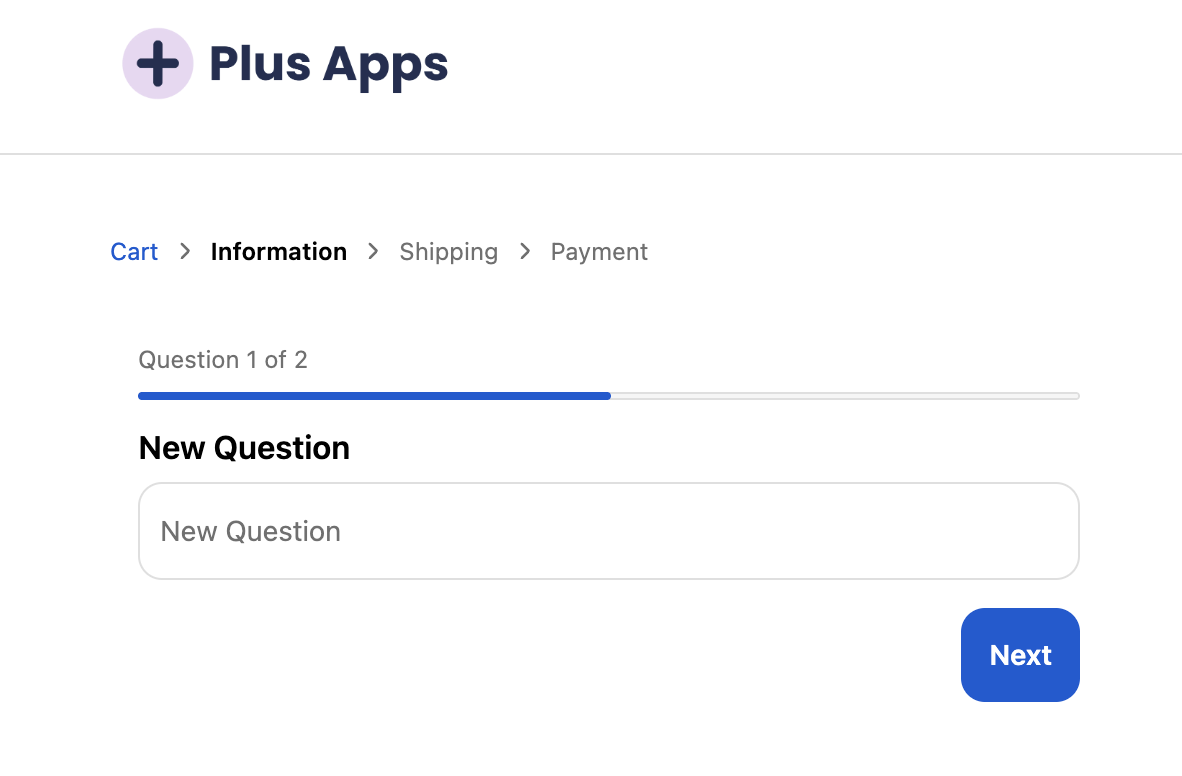
Ask how shoppers heard about you or collect quick feedback with a survey or form. The Paginated Layout shows one question at a time with a progress indicator and a Next button, so a multi-question survey doesn't feel like homework.
Trust badges and reviews
Put trust badges, payment icons, a short benefits list, and reviews close to the pay button. Checkout Plus can show reviews from Judge.me, Okendo, and Yotpo right in checkout.
Checkout upsells
Recommend a complementary product right in checkout, with scrollable layouts that fit more options without crowding the page. Keep it to one or two relevant add-ons. Step-by-step: How to add upsells to Shopify checkout.

Translations
Selling in more than one language? Checkout Plus keeps block copy in Extension translations, with named instances you can reuse across blocks. Here's how to translate your Checkout Plus extensions.
Which plan covers what
- Basic ($19/mo, all Shopify plans): Thank you and Order status page customizations, post-purchase upsells, payment and shipping customizations, and order validations and limits
- Plus ($49/mo, Shopify Plus required): adds in-checkout customizations, including custom fields and checkboxes and trust badges
- Advanced ($99/mo, Shopify Plus required): adds checkout upsells, auto-add gift with purchase, and surveys and forms
Every plan comes with a 7-day free trial. Not on Shopify Plus? Start with Basic.
FAQ
Can I customize the Shopify checkout without Shopify Plus?
Yes. On Basic and higher, you can brand your checkout in the checkout and accounts editor, add app blocks to the Thank you and Order status pages, and use public apps built on Shopify Functions. Adding app blocks inside the Information, Shipping, and Payment steps needs Shopify Plus.
Is checkout.liquid still supported in 2026?
No. It's unsupported on the checkout steps, and it was sunset on the Thank you and Order status pages too. Customizations now use checkout UI extensions, Shopify Functions, web pixels, and apps. Our checkout.liquid alternative guide walks through the swap.
What is Checkout Extensibility?
It's the umbrella term for Shopify's upgrade-safe way to customize checkout: the checkout and accounts editor, checkout UI extensions, Shopify Functions, branding APIs, and web pixels. Newer Shopify docs also call it Shopify Extensions in Checkout.
Can I add custom fields to the Shopify checkout?
On Shopify Plus, yes. Use an app that adds custom field blocks to the checkout steps (Shopify lists things like gift wrap preferences and delivery instructions as examples). On other plans, you can collect info on the Thank you or Order status page instead, for example with a survey.
How do I add a countdown timer to the Shopify checkout?
Use an app with a banner block that supports a timer. In Checkout Plus, add a Custom Banner and insert the Countdown timer dynamic value. In-checkout placement needs Shopify Plus. On other plans, you can show it on the Thank you and Order status pages.
How do I keep conversion tracking working on the new Thank you page?
Use pixels in the Customer events section of your admin, either app pixels from your ad and analytics apps or a custom pixel. Then place a test order and confirm the purchase shows up where you expect it.
Can I customize the checkout for different countries?
Yes, if your store is on Shopify's Advanced or Plus plan. The checkout and accounts editor lets you customize settings, branding, and blocks by market.
Wrapping up
Customizing the Shopify checkout in 2026 comes down to five moves: brand it in the editor, add the right app blocks, handle rules with Functions, make the most of the Thank you and Order status pages, and test everything before you publish. Start with branding (it's included on every plan), then add one customization at a time and see how shoppers respond.
Ready to add banners, custom fields, surveys, trust badges, and upsells without code? Try Checkout Plus on the Shopify App Store.